1. Consideration:
Since different Virtual Networks are used for the Domain Controller, Primary File Server, Secondary File Server, and Session Hosts, ensure that each VNet is peered with the others, as they are all interconnected.
Additionally, the DNS servers in these VNets should point to the IP address of the Domain Controller.
2. Add Data Disk to the Primary Server:
**It is assumed Primary Server VM is created and running**
1. Go to the Server VM->Settings->Disks-> +Create and attach a new disk

2. Give the Disk name.
For Storage type-Select either Premium SSD or Standard SSD depending on the customer requirement.
For Size-Depends on the customer requirement. Specify it accordingly.
Leave the other defaults as is.
Click on Apply.

3. Initialize and format the data disk :
After attaching a data disk to an Azure VM, the next steps typically involve initializing and formatting the disk so it can be used.
1. Go to the Server VM.
Search for Disk Management. Click on Create and format hard disk partitions.

2. As soon as you open the wizard, you get the initialize disk screen. Click OK.

3. Right click on the unallocated space, click on New Simple Volume.

4. Click Next.

5. Click Next.

6. Assign the drive letter as per the requirement. Click Next.

7.Change the Volume Name as per the requirement. Click Next.

8.Click on Finish.

9. The Disk now shows as healthy.

10. In the File Explorer, the disk shows up as we require Profile-Primary (F:)

4. Join the Primary Server to the Domain:
1. Go to Server Manager->Local Server->Click on WORKGROUP.

2. Click on Change.

3. Check the Domain option. Enter the domain name. Click OK.

4. Enter the credentials that has the access to domain join the VM to the domain.

5. Domain Join is successful. Click OK.

6. System would be restarted. Click OK.

7. Click Restart Now.

5. Configure the Primary Server with File Server Role:
1. Go to Server Manager->Add Roles and Features

2. Click Next.


4. If multiple servers are listed, choose the correct one on which you need to install the File Server role. Click Next.

5. Expand File and Storage Services->File and iSCSI Services->Select File Server. Click Next.

6. Leave the default selection as is and click Next.

7. Click Install.

8. Click Close.

6. Configure the Share and NTFS permissions:
1. Double click on the F: drive.
Create a new folder and give the required name.

2. Right click on the folder. Click on Properties.


4.Click on Disable inheritance and select the first option, "Convert inherited permissions into explicit permissions on this object"
Click on Add.

5.Click on Select a principal.
When you try to add a group, the UAC screen may pop up, asking for credentials with domain permissions. If you are logged into the Server VM using a domain user ID, you might not see this prompt.
Enter the valid credentials.

6.Enter the required security group who would be accessing the FSLogix user profiles, click OK.

7. In the Applies to: select This folder only.
In the Basic permissions-Check Modify.
Click on OK

8. Again click on Add, search for the admin in the environment.
In the Applies to: select This folder, subfolders and files.
In the Basic permissions-Check Full Control.
Click on OK.

9. Remove all other entries except these three.
Click on CREATER OWNER and click on Edit.

10.In the Applies to: select Subfolders and files only
In the Basic permissions-Check Modify
Click on OK.

11. The final NTFS permissions should be configured as follows:
Click on Apply. OK.

12. Right click on Profiles folder and select Properties.

13. Click on Sharing->Advanced Sharing.

14.Check the box: Share this folder.
Then click on Permissions.

15. Click on Add

16.Select the required security group.
Give the security group the Change permission.
Click on Everyone and Remove it.

17. Click on Add.

18. Select the Admin account. Click OK. Give the Admin account the Full Control.


19. Click Apply. OK.
20. Click on Apply. OK.

19.Copy the Network Path as this is required to be entered in the VHD Locations GPO setting for FSLogix.

7. Setup DFS Namespace:
DFS Namespaces is a Windows Server feature that lets you organize shared folders from different servers into a single, logical namespace. This allows users to access files from multiple servers using a single path.
1. Go to File Server -Server Manager->Add Roles and Features
2. Click Next.
3. Role-based or feature-based installation option is selected by default. Click Next.
4. If multiple servers are listed, choose the correct on which we have configured the profile share.Click Next.
5. Expand File and Storage Services->File and iSCSI Services->Select DFS Namespaces. Click Next.

6. Click Next.
7. Click Install.
8. Click Close.

8. Configure DFS Namespace:
1. Go to Server manager->Tools->DFS Management.


3. In the Server, enter the file server name where our share is located.
Click on Browse.
Check for the File Server name. Click on OK.

4. Click Next.

5. Enter a suitable name for the Namespace.
Click on Edit Settings.

6. Change the local path of the shared folder from C: to F:, as this is where the share has been created.
Click OK.

7. Click Next.

8. Leave the default as it is: Domain- based namespace.
Click Next.

9. Review the settings.
Click on Create.

10. Click on Close.


Click on Add.

13. Click on Browse.

14. Select Profiles. Click on OK

15. Click OK.

16. Click OK.

17. Namespace configuration is completed.

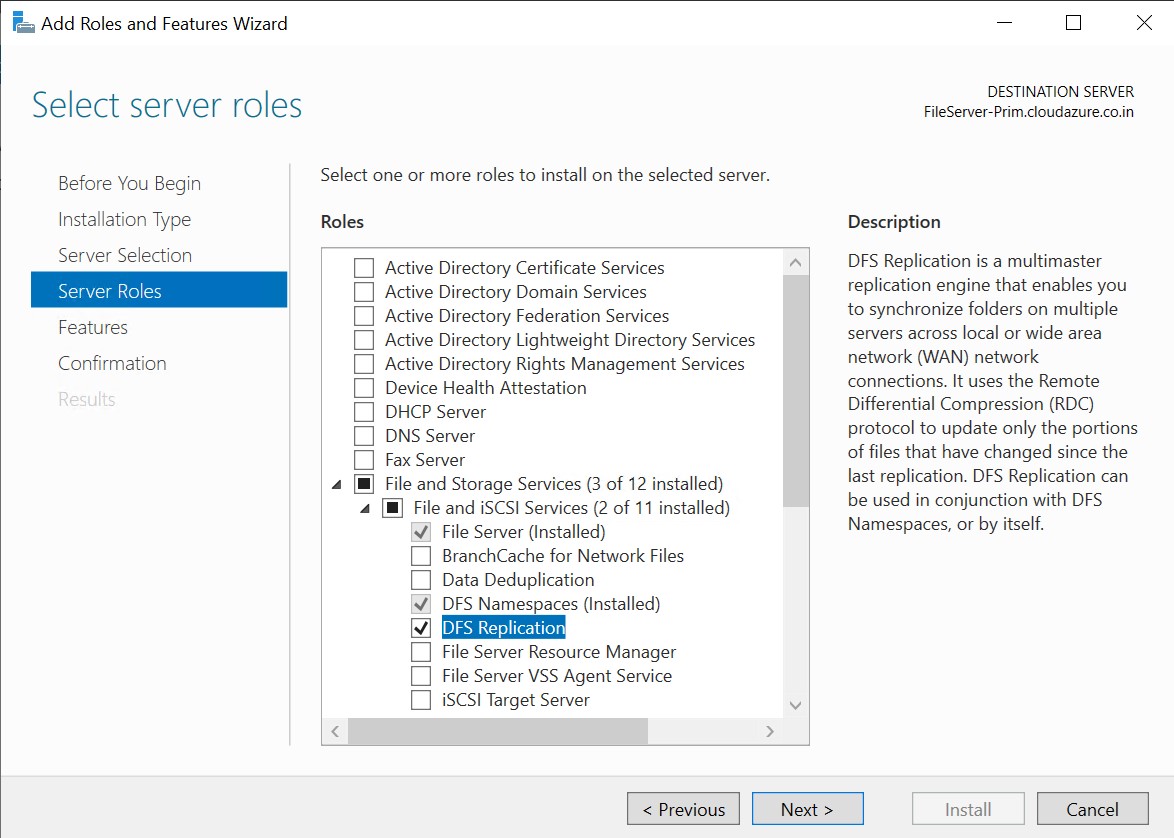
9. Setup DFS Replication:
DFS Replication is a feature in Windows Server that automatically keeps copies of files synchronized across multiple servers. In simple terms, it ensures that the same files are consistently updated and available on different servers, so you have a backup and can access files from different locations.
1. Go to Primary File Server -Server Manager->Add Roles and Features
2. Click Next.
3. Role-based or feature-based installation option is selected by default. Click Next.
4. If multiple servers are listed, choose the correct on which we have configured the profile share. Click Next.
5. Expand File and Storage Services->File and iSCSI Services->Select DFS Replication. Click Next.
6. Click Next.
7. Click Install.
8. Click Close.
**Perform Steps 2, Step 3, Steps 4, Steps 5, Step 6, Step 7 and Step 9 for the Secondary File Server**
**Do not perform Step 8**
10. Configure DFS Replication on the Primary Server:
1. Go to Server manager->Tools->DFS Management.2. Select the Namespace and on the right hand side click on Replicate Folder.

3. Click Yes.


14. Depending on the customer's requirements, you should select the appropriate bandwidth and replication schedule. Click Next.

3. Click Yes.

4. Click on Browse.

5. Click on Browse again.
6. Check for the secondary file server name. Click OK.

6. Check for the secondary file server name. Click OK.

7.Click on OK.

8. Click OK again.

9. Click Yes.

10. Click Next.

11. Click Next.

12. Select the Primary Server. Click Next.

13. In a production environment, it should ideally be set up as Hub and Spoke. However, in our case, it is configured as Full Mesh. Click Next.

14. Depending on the customer's requirements, you should select the appropriate bandwidth and replication schedule. Click Next.

15. Review the Settings. Click on Create.

16. Click Close.

17. Click OK.


11. Testing:
1. User1 has saved a file in the Primary Region-Session Host.


2. After a disaster occurs, User1 logs into the Session Hosts in the secondary region. Ideally, they should be able to see all the files they had in the primary region.


3. Hence proved 😊
Comments
Post a Comment