Note: If you’ve been following my blogs, you know that we are currently logged into the DC VM using the Administrator account.
1. Add a Custom UPN Suffix:
To use a different UPN suffix (like @cloudazure.co.in) in Active Directory when your domain is cloudazure.local, you'll need to add a custom UPN suffix in Active Directory Domains and Trusts. Here's how you can do it:
1. Go to Server Manager → Tools → Active Directory Domains and Trusts
2. Right-click on Active Directory Domains and Trusts→ Properties
3. Enter the required UPN suffix and click
Add.
4. Click Apply OK.

2. What Is Active Directory Users and Computers (ADUC) and How to Access It?
Active Directory Users and Computers (ADUC) is a Microsoft Management Console (MMC) tool used by IT administrators to manage users, groups, computers, and organizational units (OUs) within an Active Directory domain. It allows centralized control over network resources, user permissions, and security policies.
You can do this in two ways:
Go to Server Manager → Tools → Active Directory Users and Computers
Press Win + R, open Run- type "dsa.msc" and press Enter.
Both methods will take you to the same screen:
3. What Is an Organizational Unit (OU) in Active Directory and How to Create It?
An Organizational Unit (OU) is like a folder inside Active Directory where you can put users, computers, or groups that belong together — like a department (HR, IT, Sales).
You use OUs to:
For our lab setup, we will create four OUs: Admin Team, IT-Users, and AVD OU nested under VMs OU.
Admin Team will contain admin users and security groups.
IT-Users will contain IT AVD end users and their security group.
AVD OU will contain AVD session hosts.
We are nesting AVD OU under VMs OU to simulate a production-like environment.
Open Active Directory Users and Computers.
There are two ways to create an OU: either click the folder icon in the top toolbar, or right-click → New → Organizational Unit.
3.1. Create Organization Units (OU):
1. Open Active Directory Users and Computers.
2. Right-click on the domain → New → Organizational Unit.
3. Give it a name, 'Admin Team'. Click OK.
4. "Protect container from accidental deletion" is a setting in Active Directory that helps prevent users—even administrators—from accidentally deleting the OU. This option is enabled by default.
5. Similarly, create an OU named 'IT-Users'
6. As mentioned earlier, we're nesting the AVD OU under the VMs OU to simulate a production-like environment. So first, create an OU named "VMs", and then create another OU named "AVD" inside it.
7. Right-click 'VMs' OU→ New → Organizational Unit.
8. Give it the name, 'AVD'. Click OK.
9. Similarly, create another OU and name it 'OnPrem Devices'. So, there you have it.
4. What Are Security Groups in Active Directory and How to Create Them?
A Security Group in Active Directory is a collection of users, computers, or other groups that are grouped together to simplify the assignment of permissions and access control. Security groups are used to manage access to resources efficiently. Instead of assigning permissions to each user individually, you assign them to a group, and then add users to that group.
Technically, you can create security group in any OU, there are two ways to do this: either click the users (human) icon in the top toolbar, or right-click → New → Group.
Enter the Group name.
Group Scope and Group Type are pre-selected by default—no need to change them.
Group Scope:
Domain Local – Used for assigning permissions within the same domain.
Global – Used mostly for user/group organization.
Universal – Used in multi-domain forests.
Group Type:
Security Group: Used to assign access permissions to resources like files, folders, and systems within a network.
Distribution Group: Used to send email messages to multiple users without assigning access permissions.
4.1. Create Security Group in 'Admin Team' OU:
This security group is created for admin users who may perform administrative tasks such as domain joining and GPO management. Instead of assigning access to individual users, we will assign it at the security group level, following best practices.
1. Enter the Group Name: SG_AD_Admin_Tasks
2. Click OK.
4.2. Create Security Group in 'IT-Users' OU:
This security group is created for end users who will access the Azure File Share and AVD Session Hosts, as well as for assigning licenses and enabling MFA through Conditional Access Policies.
1. Enter the Group Name: SG_AVD_UserGroup
2. Click OK.
5. What Are Users in Active Directory and How to Create Them?
1. User Account
A user in Active Directory is typically a domain user account, which allows access to domain resources like file shares, printers, and systems.
Each user account contains:
-
Username (SAMAccountName) – e.g., jsmith
-
User Principal Name (UPN) – e.g., jsmith@example.com
-
Password
-
Group memberships (e.g., Domain Users, Administrators)
-
Profile information (full name, department, etc.)
-
Permissions and access control settings
2. Types of Users
-
Regular user accounts – for employees or individuals.
-
Service accounts – used by services or applications to run processes.
-
Administrator accounts – have elevated privileges to manage the domain.
-
Guest accounts – temporary or restricted use (usually disabled by default).
3. Where Users Are Stored
User accounts are stored in Organizational Units (OUs) or containers within the Active Directory domain.
4. Management Tools
Admins manage users via:
-
Active Directory Users and Computers (ADUC) MMC console
-
PowerShell (Get-ADUser, New-ADUser, etc.)
-
Group Policy for applying security or configuration settings
5. How to Create a User?
1. Navigate to Active Directory Users and Computers tab.
2. Technically, you can create users in any OU. There are two ways to do this: either click the user (human) icon in the top toolbar, or right-click → New → User.
5.1. Create an AVD User in 'IT-Users' OU:
1. Enter the first name, last name, and user logon name. Notice that both ".local" and ".co.in" suffixes are available — we will select the ".co.in" suffix.
We are choosing the .co.in UPN suffix because it is a publicly routable domain, ensuring compatibility with cloud services like Microsoft 365 and Azure AD. It also aligns with users’ email addresses, simplifying login and improving the user experience.
2. Click Next.
3. Enter the password and confirm it, then click Next.
User must change password at next logon (Default)
Purpose: Forces the user to create a new password the first time they log in.
Use when: Setting a temporary password during account creation for security.
User cannot change password
Purpose: Prevents the user from changing their own password.
Use when: You want full administrative control over the account's password (e.g., for shared or service accounts).
Password never expires
Purpose: Exempts the account from password expiration policies.
Use when: Used for service accounts or accounts that should avoid forced password changes.
Account is disabled
Purpose: Creates the account in a disabled state.
Use when: You're setting up an account that shouldn't be used yet (e.g., future hire, staged setup).
4. Click Finish.
5.2. Create two Service Accounts in 'Admin Team' OU:
A user account—or service account, as it’s called in the IT world—is used to perform administrative tasks such as adding VMs to the domain, managing group policies, and setting up tools like Entra ID Connect. The process of creating both types of accounts is the same.
We are using the .local UPN suffix to maintain compatibility with on-premises applications that do not require internet routability or cloud integration. It helps isolate internal accounts from external exposure for enhanced internal security.
5.2.1. Create svc_ADMgmt:
This service account will be used for domain joining and Group Policy management purposes.
1. Click Next.
2. On the Password page when creating a service account, check:
3. Click Finish.
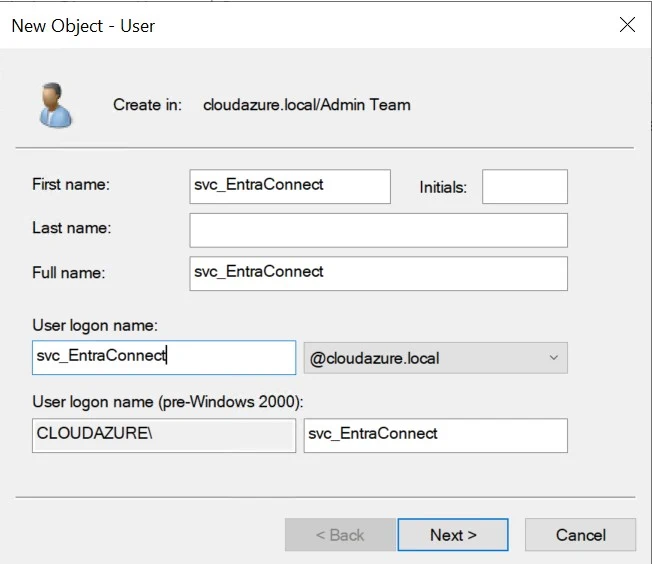
5.2.2. Create svc_EntraConnect:
This service account will be used exclusively for the Entra ID Connect setup.
6. How to Find a User and Edit its properties? (Optional)
1. Right-click the domain and select 'Find'.
2. You can enter any first or last name, then click 'Find Now'.
3. Double-click the user. In the General tab, add additional information such as description, office, email, etc., if needed. Then click Apply and OK.
4. In the Account tab, you can unlock the user account if it gets locked, and you also have the option to set an expiry date for the user.
5. The "Member Of" tab shows and lets you manage all the groups a user belongs to in Active Directory.
7. Add Members to the Security Group:
7.1. Add 'svc_ADMgmt' to 'SG_AD_Admin_Tasks'
1. Search for the service account (svc_ADMgmt), navigate to Member Of tab. Click Add. Search for the security group (SG_AD_Admin_Tasks), click OK. Apply.
2. End result:
7.2. Add 'AVD user' to 'SG_AVD_UserGroup'
1. Search for the AVD user (Annie Sujith), navigate to Member Of tab. Click Add. Search for the security group (SG_AVD_UserGroup), click OK. Apply.
2. End Result:
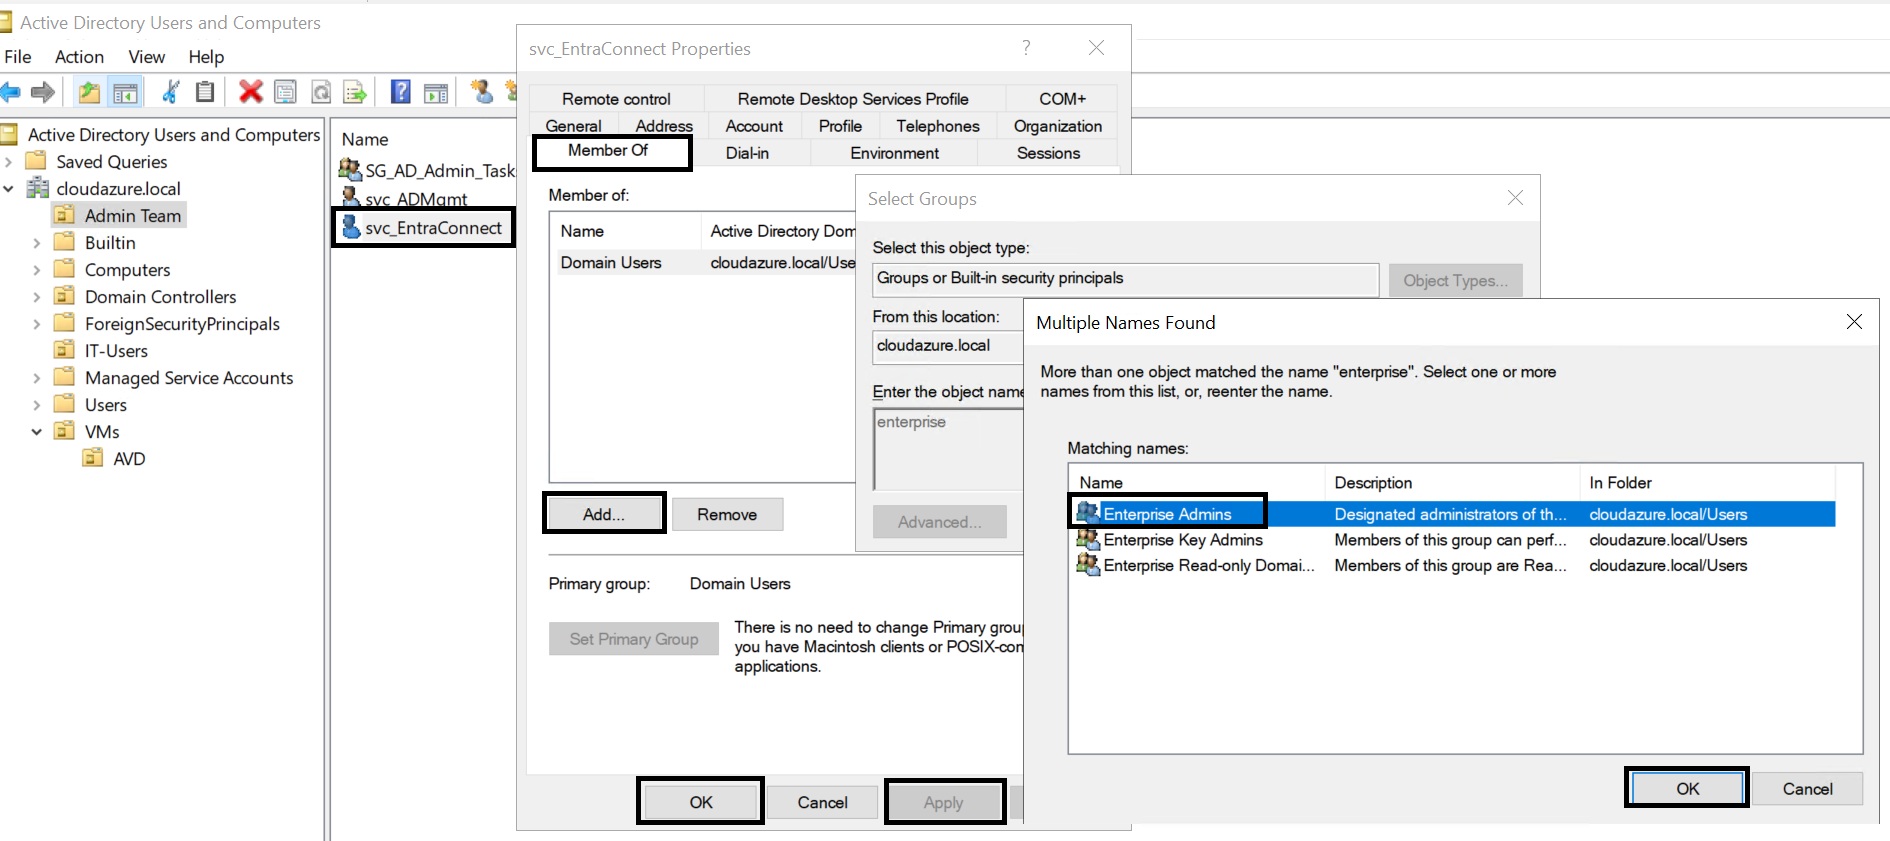
7.3. Add 'svc_EntraConnect' to 'Enterprise Admins'
Enterprise Admins access is needed during the Entra ID Connect setup, which we will be covering in the upcoming blogs.
1. Search for the service account (svc_EntraConnect), navigate to Member Of tab. Click Add. Search for the security group (Enterprise Admins), click OK. Apply.
2. End Result:
8. Delegate Permissions for Domain Join:
We will grant the security group (SG_AD_Admin_Tasks) permission to join session hosts to the AVD OU only, in accordance with best practices. Access will not be given at the domain level, as it is not necessary. Since the permissions are assigned to a security group, they will be inherited by the service account that is a member of this group.
1. Open Active Directory Users and Computers.
2. Right click the 'AVD' OU. Select Delegate Control
3. Click Next.
4. Add the 'SG_AD_Admin_Tasks' security group. Click Next.
5. Use
“Create a custom task to delegate” option. Click Next.
6. Keep the default as is. Click Next.
7. Following permissions have been selected:
Create Computer Objects
Delete Computer Objects
8. Click Next.
9. Click Finish.
9. Delegate Permissions for Group Policy Management:
1. Go to Server Manager → Tools → Group Policy Management.
2. Navigate to Group Policy Objects→ Delegation→ Add
3. Search for the security group 'SG_AD_Admin_Tasks'. Click OK. We have added the Admin security group.
4. At this point, the user or group can create new GPOs but cannot link them to an OU or the domain.
5. Navigate to AVD OU→ Delegation→ Add
6. Search for the security group 'SG_AD_Admin_Tasks'. Click OK.
7. Under the Permissions tab, set the scope to This container and all child containers, then click OK.
8. We have added the Admin security group. Now the Service Account can create and link GPOs to the “AVD” OU only.
.jpg)


Comments
Post a Comment