1. Prerequisites:
1. Go to Subscriptions -> Resource Providers. Search for 'NetApp.' For Microsoft.NetApp, click on the three horizontal dots and select 'Register.' It should then show as registered.
2. Subnet delegated to Azure NetApp Volume is required.
- Search for Virtual network in the global search. Click on it. Select the desired Virtual Network. Go to Settings->Subnets. Click on +Subnet.
- Give a suitable Name.
- Check the Box-Include an IPv4 address space.
- Select the appropriate Starting address, Size.
- Scroll down a bit, you can leave other options as default. We can discuss it in another blog when we configure Virtual networks.
- Under Subnet Delegation option, in the drop down select Microsoft.NetApp/volumes
- Click on Add.
3. User Account that has the access to join the NetApp Volume to the Domain.
4. A domain joined VM to mount the share for configuring the NTFS permission.
2. Best Practices:
1. Ensure that your NetApp account is deployed in the same region and virtual network as your session hosts to minimize latency.
2. For Prod environment, it is recommended that a Secondary DNS server is configured.
3. You can switch from Auto to Manual QoS. However, you cannot switch from Manual to Auto QoS. Setting the capacity type to Manual QoS is a permanent change.
4. The minimum quota that can be set for a volume resource is 100 GiB; it cannot be set to a lower value.
5. Please create separate volumes for both the FSLogix Profile Containers and the Office 365 Containers. When planning for replication or disaster recovery, it is advisable to exclude the Office 365 Container data from replication. This is because the Office 365 Container typically contains cached data that can be re-synced or recreated if necessary, whereas the Profile Container data is more critical and should be included in your replication and disaster recovery strategies.
6. Select Standard for the Volume Network Features tab. Standard network features are recommended for production environments, especially if you require advanced security, performance.
7. Use Availability Zones for volumes to ensure high availability, fault tolerance, and effective disaster recovery.
3. Create Azure NetApp Files account:
1. In the Global Search, search for NetApp in the search bar. Click on Azure NetApp Files.
Click on Create.
2. Give the Name.
Select the appropriate Subscription.
Select the Resource Group and Location.
Click on Create.
4. Join the NetApp account to the domain:
1. Select the Azure NetApp file recently created.
2. Go to Azure NetApp Files->Active Directory connections
3. Click on Join.
4. Enter the Primary DNS IP address.
In the AD DNS Domain Name enter the FQDN (Fully Qualified Domain Name) of your domain.
AD Site name [For AD Site name, go to the Server manager-> Tools -> Active Directory Sites and Services. Then click on Sites. You would find the Site name] (As an AVD admin you might not have access to AD, connect with the Windows Server team to get the details)
In the SMB Server Prefix field, enter the name of the computer object for the Azure NetApp Files that you wish to have in Active Directory (AD). Along with the name a random number also gets added along with the name you have provided as shown below:
For the OU path, enter the OU=SecondLevel,OU=FirstLevel.
5. Scroll down, leave the other parameters as unchecked as they are not mandate.
6. Enter the username and password of the user account that has access to add the computer object to the specified OU.
Username should be in the below format only.
Click on Join.
7. Once the join process is successful, the details will be displayed in the Active Directory Connections tab

5. Create a Capacity Pool:
A capacity pool in Azure NetApp Files is a logical container used to group and organize your storage volumes based on capacity and performance needs.
1. Select the Azure NetApp File Account Created.
2. Go to Storage Services->Capacity Pools. Click on +Add pool.
3. Give a suitable name.
In the Service Level drop down you will find three options: Standard, Premium and Ultra.
Standard: Suitable for general-purpose workloads that do not require high performance.
Premium: Designed for high-performance workloads like databases and applications with demanding IOPS requirements.
Ultra: Provides extremely high performance with low latency, ideal for very intensive workloads.
Select Service level depending on the Customer Requirement.
In the Size section, minimum is 1 TiB and highest is 2048 TiB. Chose based on Customer requirement.
In the QoS Type there are 2 options: Manual and Auto.
Manual: You explicitly set the IOPS (Input/Output Operations Per Second) and throughput limits for your volumes within a capacity pool.
Auto: Azure NetApp Files automatically manages the IOPS and throughput limits based on the performance tier of the capacity pool and the workload demands.
5. Once the capacity pool is created, you can click on 'Change QoS Type' if needed. However, be aware that this action will trigger a warning, and you cannot revert the change. Make sure you are certain before making any adjustments.
6. Create a New Volume:
1. Search for Azure NetApp File in the global search. Go to the Capacity Volume you just created.
Go to Storage service->Volumes->+Add Volume.
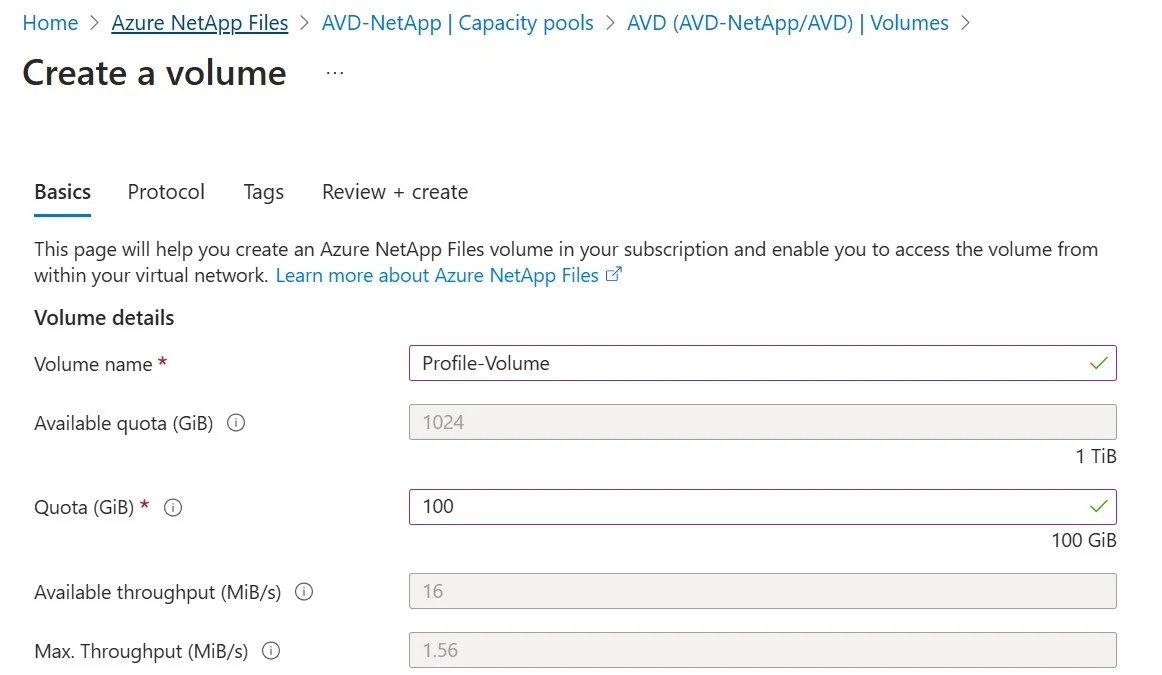
2. Give the Volume Name.
Minimum Quota Size is 100 GiB. Use it as per Customer Requirement.
Max. Throughput in MiB/s for auto qos type volumes is calculated based on size and service level. Try increasing the Quota Size and the Max Throughput would also increase.
3. Select the Virtual Network.
Select the Subnet delegated to NetApp Volume
Select Standard for Network Features.
Select the Availability Zone.
Select the Encryption key source as Microsoft Managed key. This is the only option available. I could not see the Customer Managed Key (CMK) option.
Click Next Protocol.
The Active Directory and the Share Name tab gets auto populated.
Check all the 3 options:
Enable Access Based Enumeration
Enable SMB3 Protocol Encryption
Enable Continuous Availability
Click on Next: Tags
5. Click on Create.6. Follow Steps 1-5 and create a separate Volume for O365 container as well.
7. Set NTFS permissions on the share:
1. Go to the Azure Netapp Volume->Storage Service->Mount Instructions
Copy the path.
2. Open the copied path in the File Explorer. Right Click and Click on Properties.
3. Click on Security->Advanced. Click on Disable Inheritance
4. Click on Add.
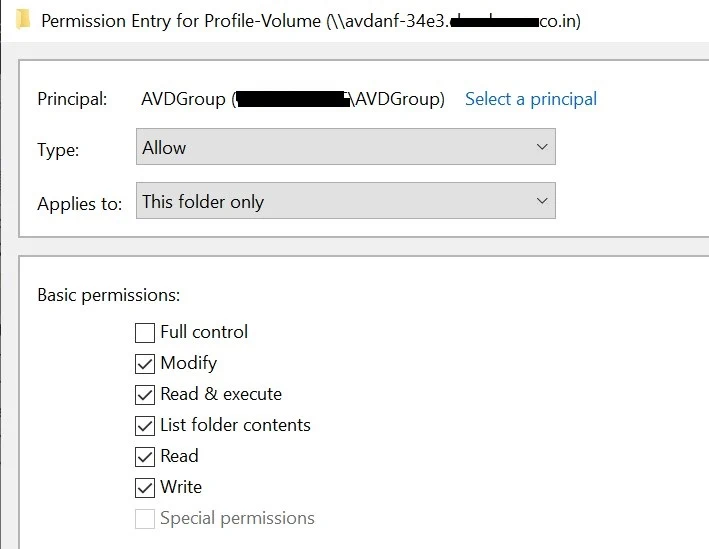
5.Click on Select a Principal. Enter the AVD Security Group that is being created for the users.
Give the Modify permission to this folder only
6.Click on Add. Click on Select a Principal. Enter CREATOR OWNER.
Give the Modify permission to Subfolders and Files only.7. Select Everyone and click on Remove.
8. The final NTFS permissions would like this:
9. Click on Apply. OK. You may come across an error while doing so. Click on Continue and the Permissions should be applied.10. Perform the Steps 1-9 and configure the NTFS permissions for O365 Container Volume as well.
8. Testing the NetApp File Configuration:
- Two users-User1 and User2 are logged in to the same Session Host.
- When each user (user2 and user3) accesses the shared path, individual folders are successfully created that include their VHD files, and each user is only able to view their own folders.
- This confirms the NetApp File is properly configured and the NTFS permissions are working as expected.


Comments
Post a Comment