 5. Identity management

1. IM-1: Use centralized identity and authentication system
Features: Azure AD Authentication Required for Data Plane Access
Reference: Azure AD join for Azure Virtual Desktop
Under this point, we will cover the deployment of Microsoft Entra-joined session hosts in Azure Virtual Desktop.
1. Prerequisite:
1. A virtual network has been set up.
2. Owner access is required to assign session hosts to end users and to assign RBAC roles to users.
2. Configure Entra ID joined AVD Host pool:
1. Search for Azure Virtual Desktop in the global search and click Create a Host pool.

2. Under the Basics tab, select the appropriate subscription, resource group, and metadata location.
3. Assign a suitable name to the host pool.
4. For the validation environment, select 'No'.
5. The preferred app group type is Desktop. Scroll down slightly.

6. For the host pool type, select 'Pooled' from the dropdown menu.
7. For the Create Session Host Configuration, select 'No'
8. For the load balancing algorithm, select 'Breadth-first'
9. For the maximum session limit, specify the number based on the customer's requirements.
10. Click Next: Session Hosts.

12. The same resource group is selected by default.
13. Provide a suitable name for the session hosts to be created under this host pool. Ensure the name is less than 11 characters.
14. Select 'Azure virtual machine' for the Virtual machine type. Scroll down slightly.

15. For the Virtual machine location, select 'Central India'.
16. For the Availability options, you can select 'Availability Zone' or 'Availability Set' based on the customer requirements. For this demo, I have selected 'No infrastructure redundancy required'.
17. For the security type, it is recommended to select 'Trusted launch virtual machines' as a best practice.
18. Secure Boot, vTPM, and Integrity Monitoring are enabled by default. Leave these settings as they are.
19. Select the appropriate image and size based on the customer's requirements. Scroll down slightly.

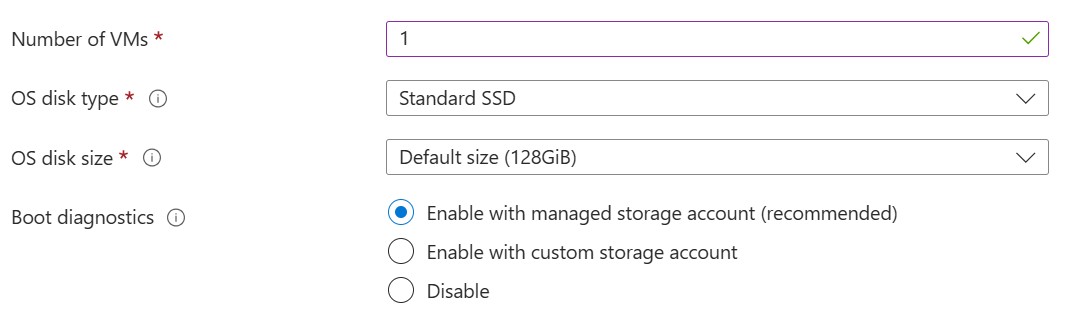
20. Specify the number of VMs based on the requirement.
21. For the OS disk type, select Standard SSD, as it is suitable for most general-purpose workloads.
22. Keep the default OS disk size as is.
23. For Boot diagnostics, select the recommended option.
24. Select the required Vnet and Subnet.
25. For the network security group type, select 'Basic' if no NSG is associated with the VNet. If an NSG is associated, select 'None'.
26. Select No for the Public inbound ports.

28. Select 'Yes' or 'No' to enroll the VM with Intune, provided Intune is configured in the tenant.
29. Provide a local admin username and password of your choice.
30. Click Next: Workspace.

31. Select 'Yes' to register desktop app group.
32. Click on Create New. Give a suitable name for the workspace. Click OK.
33. Click Next: Advanced.

35. Click Next: Tags.

36. Give meaningful tags.
37. Click Next: Review +Create.


39. The deployment is complete.

3. Assign Users to the Host pool:

2. Click on the application group.

3. Under Manage, click on Assignments.

4. Click on +Add and add the required users/groups.

4. Assign RBAC role to the users:

2. Search for the role 'Virtual Machine User Login,' select it, and click Next.

3. Click on +Select members and select the required users/groups. Click Next.

4. Click Review +assign.

1. Navigate to the host pool. Under Settings, Click on 'RDP Properties' and then click the 'Advanced' button. Enter ;targetisaadjoined:i:1 as the last custom property and click 'Save'.

6. Test User Login:
1. User login is successful.

2. IM-3: Manage application identities securely and automatically
Features: Managed Identity
Reference: Set up managed identities
1. What is a Managed Identity?
Managed identities provide an automatically managed identity in Microsoft Entra ID for applications to use when connecting to resources that support Microsoft Entra authentication. Applications can use managed identities to obtain Microsoft Entra tokens without having to manage any credentials. There are two types of managed identities: System Assigned and User Assigned.
2. Create Managed Identity:
1. Search for Managed Identity in the global search. Click on Create Managed Identity.

2. Under the Basics tab, select the appropriate subscription, resource group, and region.
3. Assign a suitable name to the managed identity depending on the resource for which it is being created.
4. Click on Review +Create.

5. The deployment is complete.

3. Use of Managed Identity from AVD POV:
1. User-assigned Managed Identity is used for the Custom Image Template. You also need to assign the Custom Role to the Managed Identity at the Resource Group level.


3. System-assigned managed identity is used to remediate non-compliant resources with Azure Policy.

3. IM-7: Restrict resource access based on conditions
Features: Conditional Access for Data Plane
Reference: Enable Conditional Access
1. Go to the Entra ID overview page, under Manage tab click on Security.

2. Under Protect, click on 'Conditional Access'.

3. Click on +Create new policy.

4. Provide a meaningful name.

5. Under Assignments > Users, select 0 users and groups selected.

6. Under the 'Include' tab, select 'Select users and groups' and check 'Users and groups', then under 'Select' click '0 users and groups selected' and select the required users/groups.

7. Under Target resources, click 'No target resources selected'

8. Under the 'Include' tab, select 'Select Resources'.
9. Under 'Select', select 'None'
10. Select the 3 apps: Azure Virtual Desktop, Microsoft Remote Desktop and Windows Cloud Login.

11. For the Network, keep the default as is.
12. Under Conditions, select '0 conditions selected'.

13. Under 'Client apps', click 'Not configured'
14. Select 'Yes' under 'Configure'
15. Select the checkboxes for Browser and Mobile Apps, and deselect the last two checkboxes.
16. Click Done.

18. Select Grant Access.
19. Check the box for Require Multifactor Authentication.
20. Click Select.

21. Click 'On' for' Enable policy'.
22. Click Create.

23. The policy is created successfully.

Comments
Post a Comment