1. Use Case:
When we updated the image in the Azure Compute Gallery, whether it was monthly patches or new applications being added, the existing session hosts did not get updated unless the updates were applied directly to the session hosts. In that case, we had to follow a manual process, such as putting the session hosts into drain mode, waiting for users to log off, removing their entries from the host pool, deleting the VMs from the Virtual Machine blade, deleting their computer objects, and then spinning up new session hosts by following the Add Virtual Machine process again, which was tedious when updates occurred frequently. The Session Host update feature helps us overcome exactly this burden.
2. Key Findings:
1. Session host update for Azure Virtual Desktop is currently in PREVIEW.

2. If you use Azure Virtual Desktop Insights, the Azure Monitor agent or Log Analytics agent is not automatically installed on the updated session hosts. You need to go to Azure Virtual Desktop Insights > Configuration Workbook > Session Hosts Data Settings and add the agents as you would when configuring monitoring for AVD.

3. Personal host pools aren't supported.
4. You can only join session hosts to an Active Directory domain. Joining session hosts to Microsoft Entra ID isn't supported, but you can use Microsoft Entra hybrid join.

5. The same number of new session hosts are created using the updated session host configuration. The new Azure resources for the VM, OS disk, and network interface are in the format SessionHostName-DateTime

6. Session host update will delete the existing session hosts, so they do not need to be deleted manually.
7. The update progress only changes when a session host has updated. As an example, in a host pool with 2 session hosts, while the first session host is being updated the progress shows as 0.00%. This only moves to 50% once the first session host has updated.

8. There can only be one session host update operation running or scheduled in a single host pool at a time. However, you can have session host update operations running on multiple host pools at the same time.

9. There is no notification screen that shows the progress of the deployment. You need to click the Refresh button periodically to check the latest status.
10. During an update with session hosts joined to Active Directory, computer objects are not deleted. This results in temporarily orphaned computer objects within Active Directory. When the new virtual machine is joined to the domain, it uses the original hostname and inherits the orphaned computer object. FSLogix GPOs applied to these computer objects work as expected when the new session hosts are deployed.
3. Prerequisites:
1. Assign the 'Azure Virtual Desktop' service principal the 'Desktop Virtualization Virtual Machine Contributor' role-based access control (RBAC) role on the subscription with the host pools and session hosts you want to use with session host update.

2. Assign the 'Azure Virtual Desktop' service principal the 'Key Vault Secrets User' role-based access control (RBAC) role on the subscription

3. Assign the Admin user ID the 'Key Vault Administrator' role-based access control (RBAC) role on the subscription to manage the key vault.

4. Create Key Vault:
1. Search for 'Key Vault' in the global search and click 'Create key vault'.

2. Select the appropriate subscription and resource group, then scroll down a bit.

3. Provide a unique and meaningful name.
4. Select the appropriate region.
5. Select 'Standard' for the pricing tier, then scroll down a bit.
6. Specify the number of days to retain deleted vaults based on the customer's requirements. The default is 90 days (maximum). I have selected 7 days (minimum).
7. For Purge protection select the default option-Disable purge protection.
8. Click Next.

9. Select 'Azure role-based access control' for the permission model.
10. For the Resource access, select 'Azure Resource Manager for template deployment'.
11. Click Next.

12. Under the Networking tab, select the default options.
13. Click Next.

14. Provide the tags. Click Review +Create.

15. Click Create.

16. The deployment is complete.

5. Create Secrets:
1. Create Secret for AD domain join UPN.
2. Select the key vault that was created. Under 'Objects', select 'Secrets' and click on +Generate/Import.

4. The secret we are going to create is for the AD join email ID. Therefore, provide a meaningful name.
5. In the secret value, specify the complete email ID to be used for domain joining the session hosts. In our case, it is onpremadmin@cloudazure.co.in.
6. Leave the remaining default options as they are.
7. Click Create.

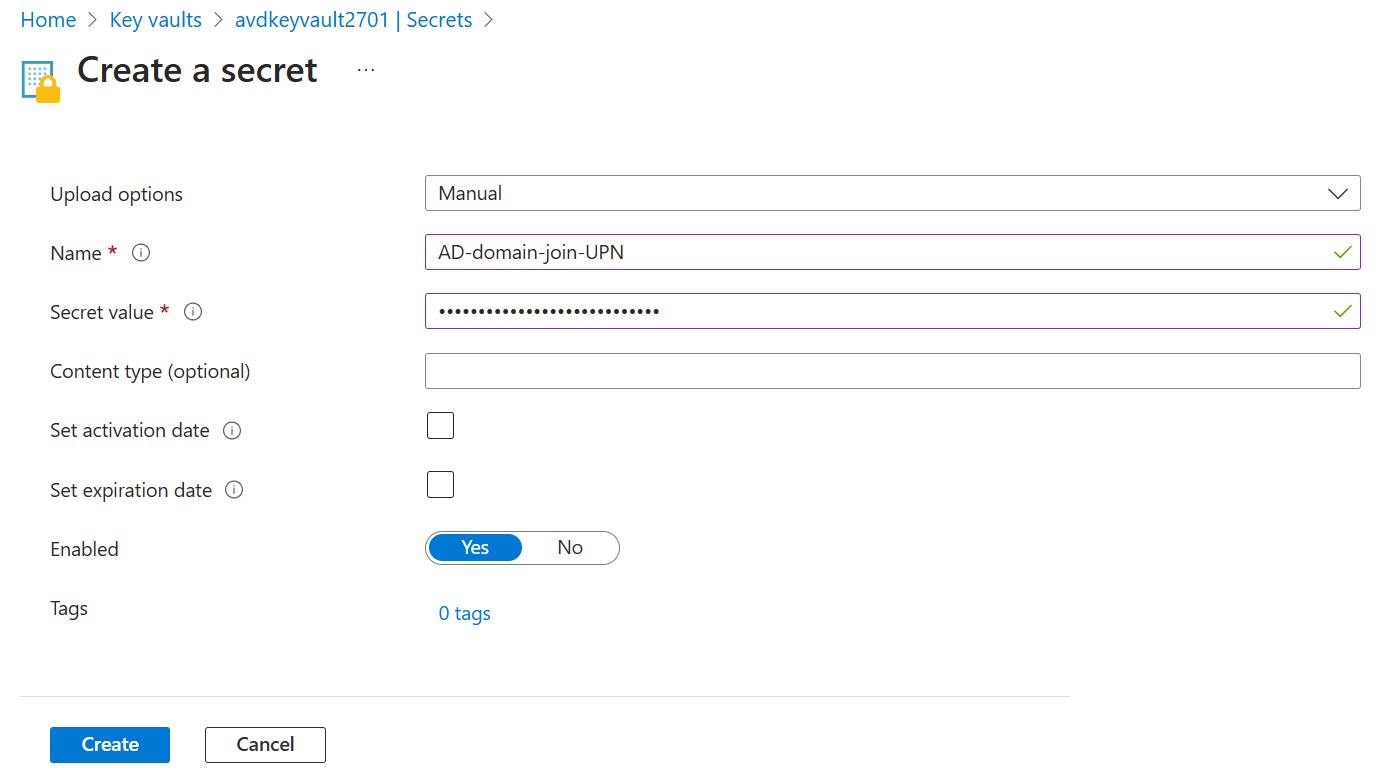
8. Secret is created successfully.

9. In a similar manner, create the secrets for 'AD domain join UPN password', 'local admin username', and 'local admin username password'

6. Create Host Pool:
1. Search for Azure Virtual Desktop in the global search and click Create a Host pool.

2. Under the Basics tab, select the appropriate subscription, resource group, and metadata location.
3. Assign a suitable name to the host pool.
4. For the validation environment, select 'No'.
5. The preferred app group type is Desktop. Scroll down slightly.

6. For the host pool type, select 'Pooled' from the dropdown menu.
7. For the Create Session Host Configuration, select 'Yes'.
8. For the load balancing algorithm, select 'Breadth-first'.
9. For the maximum session limit, specify the number based on the customer's requirements.
10. Click Next: Session Hosts.

11. Specify the number of session hosts as per customer requirement. Scroll down slightly.

13. Provide a suitable name for the session hosts to be created under this host pool. Ensure the name is less than 11 characters.
14. For the Virtual machine location, select 'Central India'.
15. For the availability zone, we need to select the number of zones, such as Zone 1, Zone 2, and Zone 3. It does not provide an option to bypass this infrastructure redundancy, unlike the traditional deployment of AVD.
16. For the security type, it is recommended to select 'Trusted launch virtual machines' as a best practice.
17. Secure Boot, vTPM are enabled by default. Leave these settings as they are. Scroll down slightly.

18. Select the appropriate image and size based on the customer's requirements.
19. For the OS disk type, select Standard SSD, as it is suitable for most general-purpose workloads.
20. For Boot diagnostics, select the recommended option. Scroll down slightly.

21. Select the required Vnet and Subnet.
22. For the network security group type, select 'Basic' if no NSG is associated with the VNet. If an NSG is associated, select 'None'.
23. Select No for the Public inbound ports. Scroll down slightly.

25. Select the key vault and secret for the AD domain join UPN, as well as the key vault and secret for the password, which we had already created in the upper section. Scroll down slightly.


 5. Under the Session hosts tab, you have the options to change the below parameters:


26. Select 'Yes' to specify domain.
27. Specify the domain name to which the session hosts should be joined.
28. Provide the OU Path.
29. Select the key vault and secret for the username, as well as the key vault and secret for the password, which we had already created in the upper section.
30. Click Next: Workspace.

31. Select 'Yes' to register desktop app group.
32. Click on Create New. Give a suitable name for the workspace. Click OK.
33. Click Next: Advanced.

34. Under the Advanced tab, leave the default settings as they are for now. However, it is recommended to enable monitoring, which I have already covered in my other blog.
35. Click Next: Tags.

36. Give meaningful tags.
37. Click Next: Review +Create.

38. Click Create.

39. The deployment is complete.

7. Session host update:
1. Open the Host pool that was just created and click on Total machines.


2. Click on Manage session host update->New Update.

3. Specify the number of session hosts in a host pool to update concurrently, known as a batch. This value is the maximum number of session hosts that are unavailable at a time during the update and all remaining session hosts are available to use.
4. Click Next: Session Hosts

Virtual machine image
Virtual machine size
Virtual machine disk type
Virtual machine security type:
Standard
Trusted launch virtual machines
Confidential virtual machines
Active Directory domain join credentials
Microsoft Intune enrollment
Local administrator credentials
6. For testing purposes, I have changed the disk type from Standard SSD to Premium SSD.
7. Once done with the changes, select Next: Schedule.

8. Under the Schedule tab, you can select 'Schedule Update Now' or choose a specified date and time, depending on the requirement.
9. Click Next: Notifications

10. Under the Notifications tab, you can specify the number of minutes before users are signed out and the sign-out message.
11. Click Next: Review

12. Click Update.

Comments
Post a Comment