
1: Set Static IP
A static IP is essential for an AD VM because it ensures consistent DNS resolution and service availability, which are critical for domain-joined clients to authenticate and apply policies reliably. Changing IPs can break connectivity and disrupt domain operations.
1. Right-click the Start menu and select Run.

2. Type "ncpa.cpl" and hit OK.

3. Right-click the Ethernet adapter and select Properties.

4. Select Internet Protocol Version 4 (TCP/IPv4), then click Properties.

5. Enter the IP address, Subnet Mask, and Default Gateway manually.
Since most users will be working in a home setup—where the physical laptop is connected to a home Wi-Fi router—they will likely receive an IP address in the 192.168.x.x range. You can assign one of these IPs to the Domain Controller VM and specify the corresponding Subnet Mask and Default Gateway.6. For the Preferred DNS Server, enter 127.0.0.1. This is commonly called the loopback address and is a special IP address that a computer uses to refer to itself.
7. Click OK.


2. Rename Server:
Renaming the AD VM within the operating system (not just in Hyper-V) is important because the computer name becomes the domain controller's identity in Active Directory. The Hyper-V VM name is only for host-level identification and has no effect inside the guest OS or AD.
1. Search for Server Manager in the Start Menu and click it.

2. Select Local Server, then click Computer Name.

3. Click Change.

4. Change the Computer name to Win2019DC01. Click OK.

5. Restart the system.

3. Install AD DS Role:
1. The Server Manager dashboard opens by default when you log in to the server. If it doesn’t, click the Start menu and search for 'Server Manager'.

2. Click Add Roles and Features.

3. Click Next.

4. Choose Role-based or feature-based installation. Click Next.
Role-based or feature-based installation:
Use this option when installing standard server roles or features on a single server, such as Active Directory, DNS, or DHCP.
Remote Desktop Services installation:
Use this option when setting up a Remote Desktop Services (RDS) environment to provide virtual desktops or remote apps to users.
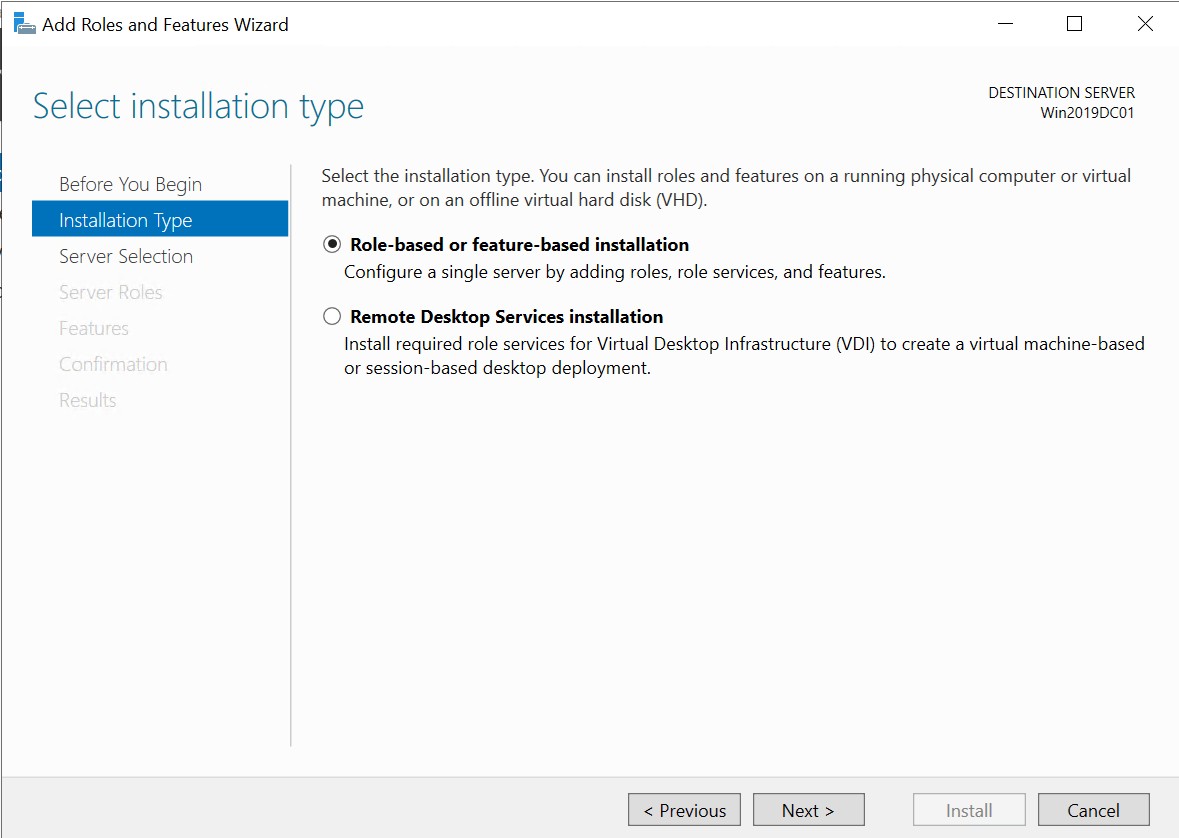
5. The server is selected by default. Click Next.

6. Select Active Directory Domain Services. An additional features window will appear automatically—click Add Features.

7. Click Next.

8. Go with the default options that are already selected, then click Next.

9. Click Next.


11. Select Add a new forest and enter a root domain name. Click Next.
- Add a new forest-Choose this when setting up Active Directory for the first time to create a completely new forest and domain.
- Add a domain controller to an existing domain-Use this option to add another domain controller to an existing domain for redundancy, load balancing, or high availability.
- Add a new domain to an existing forest- Select this to create a new child domain or domain tree within an existing Active Directory Forest.
.local is used in Active Directory to create a private, internal domain name that doesn’t conflict with public internet domains.

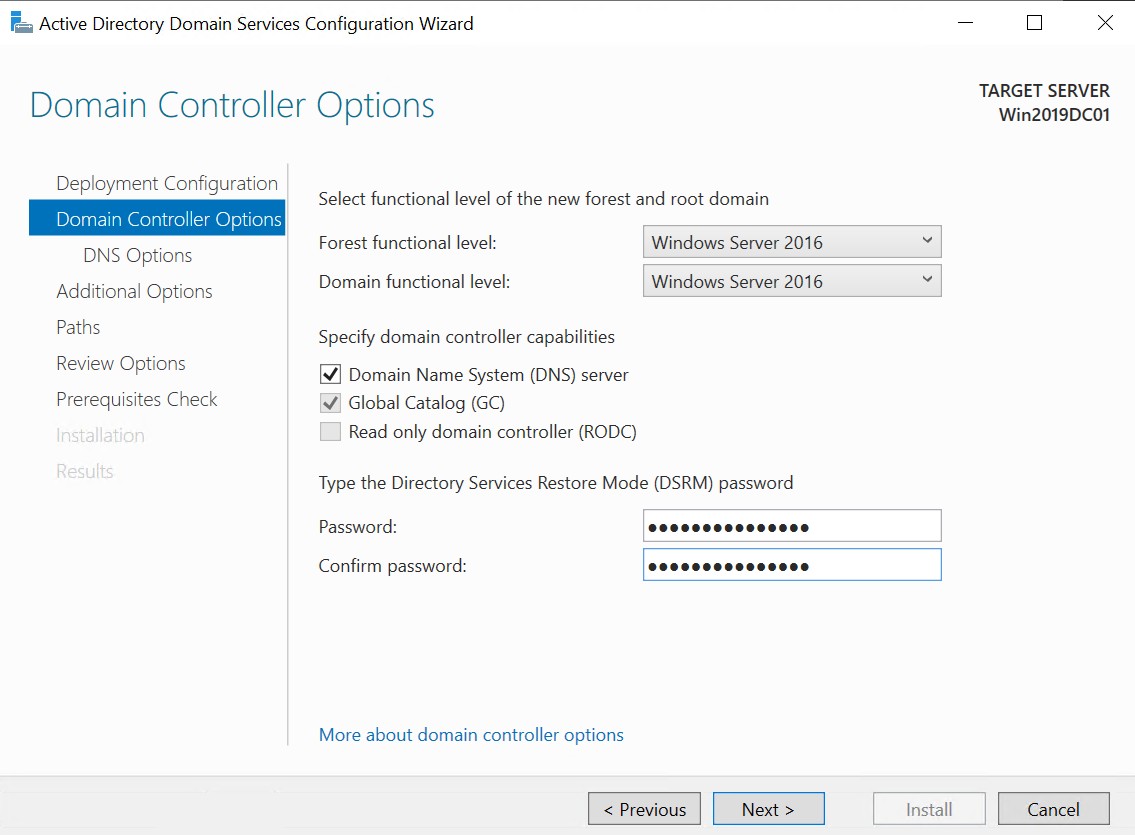
The Directory Services Restore Mode (DSRM) password is used to log into a domain controller in safe mode for performing offline maintenance or recovery of Active Directory

13. You may get a warning that a delegation for DNS cannot be created — this is normal in isolated/lab setups. Click Next.

14. Verify or set the NetBIOS domain name (auto-filled from your domain, e.g., cloudazure). Click Next.

15. Accept the default database, log files, and SYSVOL folder locations unless you have a specific configuration. Click Next.

16. Review your selections. Click Next.

17. Wait for the prerequisite check to complete. If all checks pass (or only non-blocking warnings appear), click Install.

18. The server will promote itself to a Domain Controller. It will automatically reboot after the installation completes.

Comments
Post a Comment